> ## Documentation Index
> Fetch the complete documentation index at: https://docs.snaplabs.ai/llms.txt
> Use this file to discover all available pages before exploring further.
# Connect to a data warehouse
> Configure Snowflake or Databricks credentials so Snap Data Studio can import schemas and ground models in live tables.
## What you're setting up
Warehouse credentials let Snap Data Studio read **structure** from Snowflake or Databricks — databases, catalogs, schemas, tables, and columns — so you can [import diagrams](/guides/create-logical-physical-model#reverse-engineer-import), attach tables to Copilot, and link concepts to physical entities.
Credentials are stored **per project**. Snap Data Studio never queries row data inside your tables. `SELECT` (or equivalent) is required only so the warehouse will share full object definitions.
Supported warehouses:
| Warehouse | Auth methods |
| -------------- | --------------------------------------------- |
| **Snowflake** | Access token (PAT), Private key |
| **Databricks** | OAuth (service principal), Access token (PAT) |
The same setup guides appear in product when you open the credential help drawer next to the connection form.
## Open Database Credentials
1. Open a project in Snap Data Studio.
2. Open the project menu and click **Configure DB Credentials**.
3. Choose **Snowflake** or **Databricks**, then pick an auth method.
4. Follow the matching section below (or open the in-app guide drawer for the same steps beside the form).
5. Fill the connection fields, click **Test Connection**, then save.
Prefer a dedicated service user or service principal for production. Personal tokens work for a quick trial but act as your login and stop working if your account is disabled.
## Snowflake
Run Snowflake SQL in a Snowsight worksheet (**Projects » Worksheets**). These steps use `ACCOUNTADMIN` unless noted; least-privilege alternatives are at the end of each method.
Snap Data Studio signs in as a dedicated **service user** with a token, so you never have to share your own password.
These steps use the `ACCOUNTADMIN` role. If your team restricts who can use it, see [Least privilege for PAT](#least-privilege-for-pat) at the end of this tab.
A role is how Snowflake groups permissions: you grant access to the role once, and any user holding that role gets exactly that access. Giving Snap Data Studio its own role keeps its access easy to review and easy to revoke.
```sql theme={null}
USE ROLE accountadmin;
CREATE ROLE IF NOT EXISTS snap_labs_role;
```
Give the role a warehouse to run queries on, plus read access to the databases you want to model.
```sql theme={null}
-- CHANGE COMPUTE_WH to your warehouse name
GRANT USAGE ON WAREHOUSE COMPUTE_WH TO ROLE snap_labs_role;
-- CHANGE MY_DATABASE to your database name
-- (repeat this block for every database you want to model)
GRANT USAGE ON DATABASE MY_DATABASE TO ROLE snap_labs_role;
GRANT USAGE ON ALL SCHEMAS IN DATABASE MY_DATABASE TO ROLE snap_labs_role;
GRANT USAGE ON FUTURE SCHEMAS IN DATABASE MY_DATABASE TO ROLE snap_labs_role;
GRANT SELECT ON ALL TABLES IN DATABASE MY_DATABASE TO ROLE snap_labs_role;
GRANT SELECT ON FUTURE TABLES IN DATABASE MY_DATABASE TO ROLE snap_labs_role;
GRANT SELECT ON ALL VIEWS IN DATABASE MY_DATABASE TO ROLE snap_labs_role;
GRANT SELECT ON FUTURE VIEWS IN DATABASE MY_DATABASE TO ROLE snap_labs_role;
```
**Your data stays private.** Snap Data Studio only reads structure (database, table and column definitions) to build your diagrams. It never queries the rows inside your tables. `SELECT` is granted only because Snowflake requires it before it will share a table's full definition.
A **service user** is a machine account made for applications rather than people. `TYPE = SERVICE` blocks password sign-in entirely; in this guide it authenticates with a token.
```sql theme={null}
CREATE USER IF NOT EXISTS snap_labs_service_user
TYPE = SERVICE
DEFAULT_ROLE = snap_labs_role
DEFAULT_WAREHOUSE = COMPUTE_WH; -- CHANGE to your warehouse name
GRANT ROLE snap_labs_role TO USER snap_labs_service_user;
```
Snowflake only accepts a service user's token when the request comes from an approved IP address.
In Snap Data Studio, the credential guide drawer may already fill in the live egress IP. If you are following this docs page (or the in-app guide could not detect an address), use the stand-in below, then discover the real IP with **Test Connection**.
```sql theme={null}
CREATE NETWORK POLICY IF NOT EXISTS snap_labs_network_policy
ALLOWED_IP_LIST = ('192.0.2.1');
ALTER USER snap_labs_service_user
SET NETWORK_POLICY = snap_labs_network_policy;
```
**Getting the real address:** finish generating the token and fill the connection form, then click **Test Connection**. The failure error names the real IP. Allow it with the statement below, then test again.
```sql theme={null}
ALTER NETWORK POLICY snap_labs_network_policy
SET ALLOWED_IP_LIST = ('IP_FROM_THE_ERROR');
```
Copy the secret as soon as it appears. Snowflake shows it **once**.
```sql theme={null}
ALTER USER snap_labs_service_user
ADD PROGRAMMATIC ACCESS TOKEN snap_labs_token
ROLE_RESTRICTION = 'snap_labs_role'
DAYS_TO_EXPIRY = 90;
```
If you prefer the UI, go to **Governance & Security » Users & Roles »** `snap_labs_service_user` **» Programmatic Access Tokens » Generate Token**.
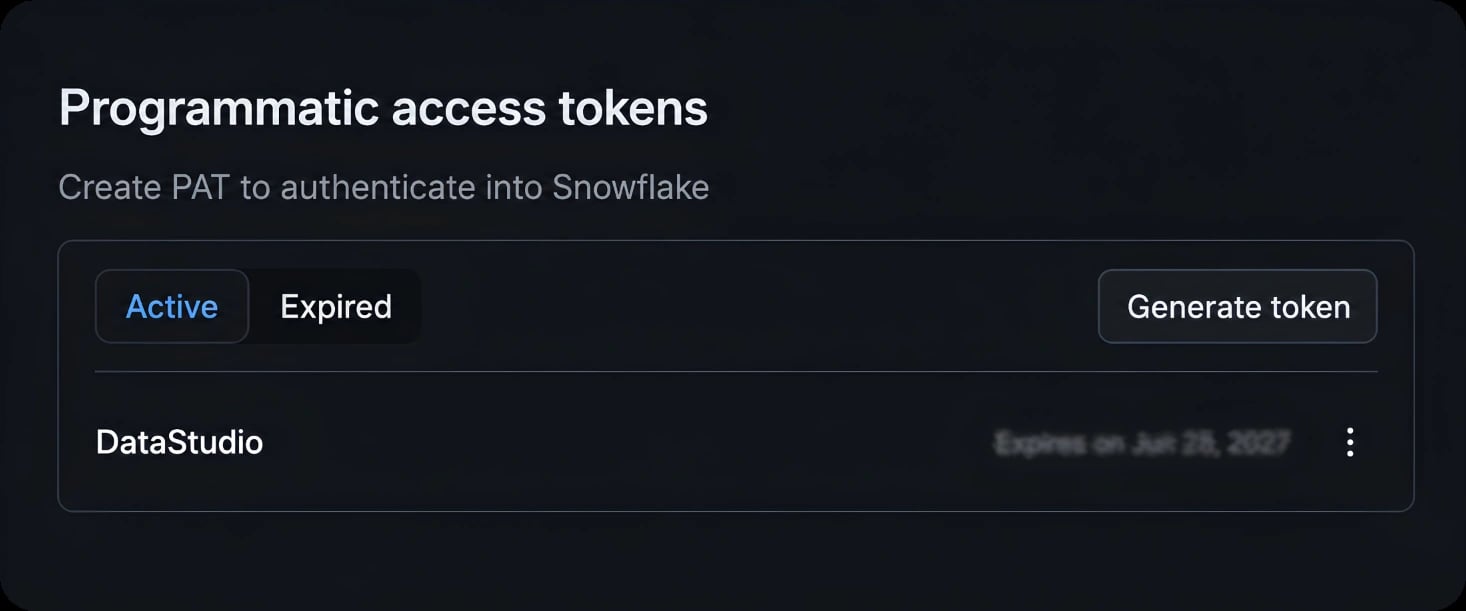
**Using a personal token:** the panel under your own **Settings » Authentication** creates a token for **your** login, not the service user. That works for a quick trial, but it acts as you and stops working if your account is ever disabled.
 Everything above is enough to connect, so feel free to skip this. This extra policy locks the service user to token sign-in only and keeps the IP check enforced even if your account's defaults ever change. Recommended on accounts shared across many teams.
```sql theme={null}
USE DATABASE MY_DATABASE; -- CHANGE: authentication policies live inside a schema
USE SCHEMA public;
CREATE AUTHENTICATION POLICY IF NOT EXISTS snap_labs_auth_policy
AUTHENTICATION_METHODS = ('PROGRAMMATIC_ACCESS_TOKEN')
PAT_POLICY = (NETWORK_POLICY_EVALUATION = ENFORCED_REQUIRED);
ALTER USER snap_labs_service_user SET AUTHENTICATION POLICY snap_labs_auth_policy;
```
Back in Snap Data Studio, fill in the connection form:
| Field | Value |
| --------- | --------------------------------------- |
| Account | your account identifier, e.g. `ab12345` |
| User | `snap_labs_service_user` |
| Role | `snap_labs_role` |
| Warehouse | your warehouse, e.g. `COMPUTE_WH` |
| Token | the secret from the generate-token step |
Hit **Test Connection**, then save.
### Least privilege for PAT
If you can't use `ACCOUNTADMIN`, each step needs only:
* Create role · `USERADMIN` (it holds `CREATE ROLE`)
* Grant read access · the warehouse and database owners, or `SECURITYADMIN` (it holds `MANAGE GRANTS`)
* Create service user · `USERADMIN`
* Network policy · `SECURITYADMIN`
* Generate token · `OWNERSHIP` or `MODIFY PROGRAMMATIC AUTHENTICATION METHODS` on the user
* Auth policy · `SECURITYADMIN`
Full reference: [Snowflake PAT docs](https://docs.snowflake.com/en/user-guide/programmatic-access-tokens).
Snap Data Studio signs in as a dedicated **service user** that authenticates with an RSA key pair: the private key stays with you, and Snowflake stores only the public half. No password and no IP allowlist are needed.
Key generation needs **OpenSSL**. On Windows it comes bundled with [Git for Windows](https://git-scm.com/download/win), or install it with `choco install openssl`. Snowflake SQL steps use `ACCOUNTADMIN`; see [Least privilege for private key](#least-privilege-for-private-key) for alternatives.
Encrypted (recommended): you'll be asked to set a passphrase that protects the key file.
```bash theme={null}
openssl genrsa 2048 | openssl pkcs8 -topk8 -v2 des3 -inform PEM -out rsa_key.p8
```
Or unencrypted:
```bash theme={null}
openssl genrsa 2048 | openssl pkcs8 -topk8 -inform PEM -out rsa_key.p8 -nocrypt
```
This creates `rsa_key.pub` from your private key.
```bash theme={null}
openssl rsa -in rsa_key.p8 -pubout -out rsa_key.pub
```
Snowflake expects the public key as a single line, without the `BEGIN/END` wrapper. Copy the output of:
```bash theme={null}
grep -v "^-----" rsa_key.pub | tr -d '\n'
```
On Windows (PowerShell):
```powershell theme={null}
(Get-Content -Raw rsa_key.pub) -replace '-----[^-]+-----', '' -replace '\s', ''
```
```sql theme={null}
USE ROLE accountadmin;
CREATE ROLE IF NOT EXISTS snap_labs_role;
-- CHANGE COMPUTE_WH to your warehouse name
GRANT USAGE ON WAREHOUSE COMPUTE_WH TO ROLE snap_labs_role;
-- CHANGE MY_DATABASE to your database name
-- (repeat this block for every database you want to model)
GRANT USAGE ON DATABASE MY_DATABASE TO ROLE snap_labs_role;
GRANT USAGE ON ALL SCHEMAS IN DATABASE MY_DATABASE TO ROLE snap_labs_role;
GRANT USAGE ON FUTURE SCHEMAS IN DATABASE MY_DATABASE TO ROLE snap_labs_role;
GRANT SELECT ON ALL TABLES IN DATABASE MY_DATABASE TO ROLE snap_labs_role;
GRANT SELECT ON FUTURE TABLES IN DATABASE MY_DATABASE TO ROLE snap_labs_role;
GRANT SELECT ON ALL VIEWS IN DATABASE MY_DATABASE TO ROLE snap_labs_role;
GRANT SELECT ON FUTURE VIEWS IN DATABASE MY_DATABASE TO ROLE snap_labs_role;
```
**Your data stays private.** Snap Data Studio only reads structure (database, table and column definitions) to build your diagrams. It never queries the rows inside your tables. `SELECT` is granted only because Snowflake requires it before it will share a table's full definition.
Before running the SQL, replace `KEY_BODY_FROM_STEP_3` with the long single-line string you copied earlier, keeping the quotes around it. The line will end up looking like `RSA_PUBLIC_KEY = 'MIIBIjANBgkq...'`. Unlike tokens, Snowsight has no UI panel for keys, so this step is SQL-only.
```sql theme={null}
CREATE USER IF NOT EXISTS snap_labs_service_user
TYPE = SERVICE
DEFAULT_ROLE = snap_labs_role
DEFAULT_WAREHOUSE = COMPUTE_WH -- CHANGE to your warehouse name
RSA_PUBLIC_KEY = 'KEY_BODY_FROM_STEP_3'; -- CHANGE: paste the single-line key
GRANT ROLE snap_labs_role TO USER snap_labs_service_user;
```
Already created this user earlier? `CREATE USER IF NOT EXISTS` won't update it. Set the key directly instead: `ALTER USER snap_labs_service_user SET RSA_PUBLIC_KEY = 'KEY_BODY_FROM_STEP_3';`
Back in Snap Data Studio, fill in the connection form:
| Field | Value |
| ----------- | ------------------------------------------------------------------ |
| Account | your account identifier, e.g. `ab12345` |
| User | `snap_labs_service_user` |
| Role | `snap_labs_role` |
| Warehouse | your warehouse, e.g. `COMPUTE_WH` |
| Private key | the full contents of `rsa_key.p8`, including the `BEGIN/END` lines |
| Passphrase | only if you encrypted the key |
Hit **Test Connection**, then save.
### Least privilege for private key
If you can't use `ACCOUNTADMIN`:
* Create role and grants · `USERADMIN` for `CREATE ROLE`; the grants need the warehouse and database owners, or `SECURITYADMIN`
* Create service user · `USERADMIN` (as the user's creator it can also set the key); otherwise `OWNERSHIP` or `MODIFY PROGRAMMATIC AUTHENTICATION METHODS` on the user
Full reference: [Snowflake key-pair docs](https://docs.snowflake.com/en/user-guide/key-pair-auth).
## Databricks
Snap Data Studio connects to a Databricks SQL warehouse as a dedicated **service principal** — a machine account for applications rather than people. OAuth is the method Databricks recommends for connected tools.
OAuth setup happens in the Databricks UI: no tokens, notebooks, or command line.
Creating the service principal and grants needs a **workspace admin**.
In your Databricks workspace, open **SQL Warehouses**, select your warehouse, then open the **Connection details** tab. Copy the **Server hostname** and **HTTP path** into the matching fields in Snap Data Studio.
Go to **Settings » Identity and access**, select **Manage** next to **Service principals**, then **Add service principal » Add new**. Name it `snap-labs-service-principal` and confirm, making sure the **Databricks SQL access** and **Workspace access** entitlements are ticked.
Open the new principal and copy its **Application ID** (a UUID). Later steps use it.
On Azure, choose **Databricks managed** if asked how the principal is managed; no Entra ID app is needed.
Back in **SQL Warehouses**, open the **⋮** menu next to your warehouse, select **Permissions**, and add `snap-labs-service-principal` with **Can use**.
Run this in the SQL editor (**New » Query**). Granting at the catalog level automatically covers every schema and table inside it, including ones created later.
```sql theme={null}
-- CHANGE MY_CATALOG to your catalog name
-- CHANGE APPLICATION_ID to the Application ID from earlier (keep the backticks)
-- (repeat all three for every catalog you want to model)
GRANT USE CATALOG ON CATALOG MY_CATALOG TO `APPLICATION_ID`;
GRANT USE SCHEMA ON CATALOG MY_CATALOG TO `APPLICATION_ID`;
GRANT SELECT ON CATALOG MY_CATALOG TO `APPLICATION_ID`;
```
Not sure which catalogs? Open **Catalog** in the workspace's left sidebar: that top-level list is what you're choosing from. Grant each catalog that holds tables you want to diagram, and skip built-ins like `system` and `samples`. Unity Catalog has no single grant covering every catalog, so anything you skip stays invisible to Snap Data Studio. (The optional **Catalog** field in the connection form is different: it only sets the default browsing location and can stay blank.)
**Your data stays private.** Snap Data Studio only reads structure (catalog, table and column definitions) to build your diagrams. It never queries the rows inside your tables. `SELECT` is needed to read the objects' definitions.
Back on the service principal's page (**Settings » Identity and access » Service principals »** `snap-labs-service-principal`), open the **Secrets** tab and select **Generate secret**. Choose a lifetime to match your rotation policy (up to 730 days), then copy both values:
* **Client ID**: the same Application ID from earlier
* **Secret**: shown once, so copy it now
A service principal can hold at most 5 active secrets; this tab is also where you delete expired ones.
Back in Snap Data Studio, fill in the connection form:
| Field | Value |
| ---------------- | --------------------------------------------------------------- |
| Server hostname | e.g. `dbc-xxxx.cloud.databricks.com` |
| HTTP path | e.g. `/sql/1.0/warehouses/xxxx` |
| Client ID | the Application ID |
| Client secret | the secret from the previous step |
| Catalog / Schema | optional defaults; leave blank to browse everything you granted |
Hit **Test Connection**, then save.
**If the test fails** with *"Permission denied"*, the secret is right but access is missing: re-check warehouse **Can use** and the entitlements on the service principal. If your workspace enforces **IP access lists** (an Enterprise-tier feature, off by default), an admin must allow this app's outbound address first.
Full reference: [Databricks OAuth M2M docs](https://docs.databricks.com/aws/en/dev-tools/auth/oauth-m2m) · [Databricks service principals](https://docs.databricks.com/aws/en/admin/users-groups/manage-service-principals).
Prefer a fully clickable setup? Use **OAuth (service principal)** instead. Access-token setup needs a workspace admin and a notebook or terminal for the service principal token.
In your Databricks workspace, open **SQL Warehouses**, select your warehouse, then open the **Connection details** tab. Copy the **Server hostname** and **HTTP path** into the matching fields in Snap Data Studio.
Go to **Settings » Identity and access**, select **Manage** next to **Service principals**, then **Add service principal » Add new**. Name it `snap-labs-service-principal` and confirm, making sure the **Databricks SQL access** and **Workspace access** entitlements are ticked.
Open the new principal and copy its **Application ID** (a UUID).
On Azure, choose **Databricks managed** if asked how the principal is managed; no Entra ID app is needed.
Back in **SQL Warehouses**, open the **⋮** menu next to your warehouse, select **Permissions**, and add `snap-labs-service-principal` with **Can use**.
Databricks only accepts a token if its owner holds token permission. Go to **Settings » Advanced**, find **Personal Access Tokens**, select **Permissions**, and add `snap-labs-service-principal` with **Can Use**.
Run this in the SQL editor (**New » Query**):
```sql theme={null}
-- CHANGE MY_CATALOG to your catalog name
-- CHANGE APPLICATION_ID to the Application ID from earlier (keep the backticks)
-- (repeat all three for every catalog you want to model)
GRANT USE CATALOG ON CATALOG MY_CATALOG TO `APPLICATION_ID`;
GRANT USE SCHEMA ON CATALOG MY_CATALOG TO `APPLICATION_ID`;
GRANT SELECT ON CATALOG MY_CATALOG TO `APPLICATION_ID`;
```
Grant each catalog that holds tables you want to diagram, and skip built-ins like `system` and `samples`.
**Your data stays private.** Snap Data Studio only reads structure (catalog, table and column definitions) to build your diagrams. It never queries the rows inside your tables. `SELECT` is needed to read the objects' definitions.
Databricks has no UI for issuing a service principal's token, but one notebook cell does it. Select **New » Notebook**, paste the snippet, and run it on serverless or any running compute. Copy the token it prints; it's shown **once**.
```python theme={null}
from databricks.sdk import WorkspaceClient
token = WorkspaceClient().token_management.create_obo_token(
application_id="APPLICATION_ID", # CHANGE: the Application ID from earlier
lifetime_seconds=90 * 24 * 60 * 60, # 90 days; match your rotation policy
comment="Snap Data Studio",
)
print(token.token_value)
```
If the import fails, run `%pip install databricks-sdk` in a cell above and retry. Prefer a terminal? The Databricks CLI equivalent is `databricks token-management create-obo-token APPLICATION_ID --lifetime-seconds 7776000`. On Azure, if the call is rejected, have the service principal mint its own token instead (see the [Azure PAT docs](https://learn.microsoft.com/azure/databricks/dev-tools/auth/pat)).
**Using a personal token:** a token from your own **Settings » Developer » Access tokens** also works and needs no admin, which is handy for a quick trial. It acts as you, though: it can read everything you can, and it stops working if your account is ever disabled. If the token dialog offers scopes, choose **BI Tools**, or pick `sql` and `unity-catalog` manually.
Back in Snap Data Studio, fill in the connection form:
| Field | Value |
| ---------------- | --------------------------------------------------------------- |
| Server hostname | e.g. `dbc-xxxx.cloud.databricks.com` |
| HTTP path | e.g. `/sql/1.0/warehouses/xxxx` |
| Access token | the token from the previous step |
| Catalog / Schema | optional defaults; leave blank to browse everything you granted |
Hit **Test Connection**, then save.
**If the test fails** with *"scopes are too narrow"*, re-issue the token with broader scopes (service-principal tokens are unscoped; personal tokens need `sql` and `unity-catalog`). If your workspace enforces **IP access lists** (an Enterprise-tier feature, off by default), an admin must allow this app's outbound address first.
Full reference: [Databricks service principals](https://docs.databricks.com/aws/en/admin/users-groups/manage-service-principals) · [Databricks token docs](https://docs.databricks.com/aws/en/dev-tools/auth/pat).
## What's next
* [Create a logical & physical model](/guides/create-logical-physical-model) — import from DB once credentials are saved
* [Create a conceptual model](/guides/create-conceptual-model) — link warehouse tables to concepts
* [Quickstart](/get-started/quickstart)
Everything above is enough to connect, so feel free to skip this. This extra policy locks the service user to token sign-in only and keeps the IP check enforced even if your account's defaults ever change. Recommended on accounts shared across many teams.
```sql theme={null}
USE DATABASE MY_DATABASE; -- CHANGE: authentication policies live inside a schema
USE SCHEMA public;
CREATE AUTHENTICATION POLICY IF NOT EXISTS snap_labs_auth_policy
AUTHENTICATION_METHODS = ('PROGRAMMATIC_ACCESS_TOKEN')
PAT_POLICY = (NETWORK_POLICY_EVALUATION = ENFORCED_REQUIRED);
ALTER USER snap_labs_service_user SET AUTHENTICATION POLICY snap_labs_auth_policy;
```
Back in Snap Data Studio, fill in the connection form:
| Field | Value |
| --------- | --------------------------------------- |
| Account | your account identifier, e.g. `ab12345` |
| User | `snap_labs_service_user` |
| Role | `snap_labs_role` |
| Warehouse | your warehouse, e.g. `COMPUTE_WH` |
| Token | the secret from the generate-token step |
Hit **Test Connection**, then save.
### Least privilege for PAT
If you can't use `ACCOUNTADMIN`, each step needs only:
* Create role · `USERADMIN` (it holds `CREATE ROLE`)
* Grant read access · the warehouse and database owners, or `SECURITYADMIN` (it holds `MANAGE GRANTS`)
* Create service user · `USERADMIN`
* Network policy · `SECURITYADMIN`
* Generate token · `OWNERSHIP` or `MODIFY PROGRAMMATIC AUTHENTICATION METHODS` on the user
* Auth policy · `SECURITYADMIN`
Full reference: [Snowflake PAT docs](https://docs.snowflake.com/en/user-guide/programmatic-access-tokens).
Snap Data Studio signs in as a dedicated **service user** that authenticates with an RSA key pair: the private key stays with you, and Snowflake stores only the public half. No password and no IP allowlist are needed.
Key generation needs **OpenSSL**. On Windows it comes bundled with [Git for Windows](https://git-scm.com/download/win), or install it with `choco install openssl`. Snowflake SQL steps use `ACCOUNTADMIN`; see [Least privilege for private key](#least-privilege-for-private-key) for alternatives.
Encrypted (recommended): you'll be asked to set a passphrase that protects the key file.
```bash theme={null}
openssl genrsa 2048 | openssl pkcs8 -topk8 -v2 des3 -inform PEM -out rsa_key.p8
```
Or unencrypted:
```bash theme={null}
openssl genrsa 2048 | openssl pkcs8 -topk8 -inform PEM -out rsa_key.p8 -nocrypt
```
This creates `rsa_key.pub` from your private key.
```bash theme={null}
openssl rsa -in rsa_key.p8 -pubout -out rsa_key.pub
```
Snowflake expects the public key as a single line, without the `BEGIN/END` wrapper. Copy the output of:
```bash theme={null}
grep -v "^-----" rsa_key.pub | tr -d '\n'
```
On Windows (PowerShell):
```powershell theme={null}
(Get-Content -Raw rsa_key.pub) -replace '-----[^-]+-----', '' -replace '\s', ''
```
```sql theme={null}
USE ROLE accountadmin;
CREATE ROLE IF NOT EXISTS snap_labs_role;
-- CHANGE COMPUTE_WH to your warehouse name
GRANT USAGE ON WAREHOUSE COMPUTE_WH TO ROLE snap_labs_role;
-- CHANGE MY_DATABASE to your database name
-- (repeat this block for every database you want to model)
GRANT USAGE ON DATABASE MY_DATABASE TO ROLE snap_labs_role;
GRANT USAGE ON ALL SCHEMAS IN DATABASE MY_DATABASE TO ROLE snap_labs_role;
GRANT USAGE ON FUTURE SCHEMAS IN DATABASE MY_DATABASE TO ROLE snap_labs_role;
GRANT SELECT ON ALL TABLES IN DATABASE MY_DATABASE TO ROLE snap_labs_role;
GRANT SELECT ON FUTURE TABLES IN DATABASE MY_DATABASE TO ROLE snap_labs_role;
GRANT SELECT ON ALL VIEWS IN DATABASE MY_DATABASE TO ROLE snap_labs_role;
GRANT SELECT ON FUTURE VIEWS IN DATABASE MY_DATABASE TO ROLE snap_labs_role;
```
**Your data stays private.** Snap Data Studio only reads structure (database, table and column definitions) to build your diagrams. It never queries the rows inside your tables. `SELECT` is granted only because Snowflake requires it before it will share a table's full definition.
Before running the SQL, replace `KEY_BODY_FROM_STEP_3` with the long single-line string you copied earlier, keeping the quotes around it. The line will end up looking like `RSA_PUBLIC_KEY = 'MIIBIjANBgkq...'`. Unlike tokens, Snowsight has no UI panel for keys, so this step is SQL-only.
```sql theme={null}
CREATE USER IF NOT EXISTS snap_labs_service_user
TYPE = SERVICE
DEFAULT_ROLE = snap_labs_role
DEFAULT_WAREHOUSE = COMPUTE_WH -- CHANGE to your warehouse name
RSA_PUBLIC_KEY = 'KEY_BODY_FROM_STEP_3'; -- CHANGE: paste the single-line key
GRANT ROLE snap_labs_role TO USER snap_labs_service_user;
```
Already created this user earlier? `CREATE USER IF NOT EXISTS` won't update it. Set the key directly instead: `ALTER USER snap_labs_service_user SET RSA_PUBLIC_KEY = 'KEY_BODY_FROM_STEP_3';`
Back in Snap Data Studio, fill in the connection form:
| Field | Value |
| ----------- | ------------------------------------------------------------------ |
| Account | your account identifier, e.g. `ab12345` |
| User | `snap_labs_service_user` |
| Role | `snap_labs_role` |
| Warehouse | your warehouse, e.g. `COMPUTE_WH` |
| Private key | the full contents of `rsa_key.p8`, including the `BEGIN/END` lines |
| Passphrase | only if you encrypted the key |
Hit **Test Connection**, then save.
### Least privilege for private key
If you can't use `ACCOUNTADMIN`:
* Create role and grants · `USERADMIN` for `CREATE ROLE`; the grants need the warehouse and database owners, or `SECURITYADMIN`
* Create service user · `USERADMIN` (as the user's creator it can also set the key); otherwise `OWNERSHIP` or `MODIFY PROGRAMMATIC AUTHENTICATION METHODS` on the user
Full reference: [Snowflake key-pair docs](https://docs.snowflake.com/en/user-guide/key-pair-auth).
## Databricks
Snap Data Studio connects to a Databricks SQL warehouse as a dedicated **service principal** — a machine account for applications rather than people. OAuth is the method Databricks recommends for connected tools.
OAuth setup happens in the Databricks UI: no tokens, notebooks, or command line.
Creating the service principal and grants needs a **workspace admin**.
In your Databricks workspace, open **SQL Warehouses**, select your warehouse, then open the **Connection details** tab. Copy the **Server hostname** and **HTTP path** into the matching fields in Snap Data Studio.
Go to **Settings » Identity and access**, select **Manage** next to **Service principals**, then **Add service principal » Add new**. Name it `snap-labs-service-principal` and confirm, making sure the **Databricks SQL access** and **Workspace access** entitlements are ticked.
Open the new principal and copy its **Application ID** (a UUID). Later steps use it.
On Azure, choose **Databricks managed** if asked how the principal is managed; no Entra ID app is needed.
Back in **SQL Warehouses**, open the **⋮** menu next to your warehouse, select **Permissions**, and add `snap-labs-service-principal` with **Can use**.
Run this in the SQL editor (**New » Query**). Granting at the catalog level automatically covers every schema and table inside it, including ones created later.
```sql theme={null}
-- CHANGE MY_CATALOG to your catalog name
-- CHANGE APPLICATION_ID to the Application ID from earlier (keep the backticks)
-- (repeat all three for every catalog you want to model)
GRANT USE CATALOG ON CATALOG MY_CATALOG TO `APPLICATION_ID`;
GRANT USE SCHEMA ON CATALOG MY_CATALOG TO `APPLICATION_ID`;
GRANT SELECT ON CATALOG MY_CATALOG TO `APPLICATION_ID`;
```
Not sure which catalogs? Open **Catalog** in the workspace's left sidebar: that top-level list is what you're choosing from. Grant each catalog that holds tables you want to diagram, and skip built-ins like `system` and `samples`. Unity Catalog has no single grant covering every catalog, so anything you skip stays invisible to Snap Data Studio. (The optional **Catalog** field in the connection form is different: it only sets the default browsing location and can stay blank.)
**Your data stays private.** Snap Data Studio only reads structure (catalog, table and column definitions) to build your diagrams. It never queries the rows inside your tables. `SELECT` is needed to read the objects' definitions.
Back on the service principal's page (**Settings » Identity and access » Service principals »** `snap-labs-service-principal`), open the **Secrets** tab and select **Generate secret**. Choose a lifetime to match your rotation policy (up to 730 days), then copy both values:
* **Client ID**: the same Application ID from earlier
* **Secret**: shown once, so copy it now
A service principal can hold at most 5 active secrets; this tab is also where you delete expired ones.
Back in Snap Data Studio, fill in the connection form:
| Field | Value |
| ---------------- | --------------------------------------------------------------- |
| Server hostname | e.g. `dbc-xxxx.cloud.databricks.com` |
| HTTP path | e.g. `/sql/1.0/warehouses/xxxx` |
| Client ID | the Application ID |
| Client secret | the secret from the previous step |
| Catalog / Schema | optional defaults; leave blank to browse everything you granted |
Hit **Test Connection**, then save.
**If the test fails** with *"Permission denied"*, the secret is right but access is missing: re-check warehouse **Can use** and the entitlements on the service principal. If your workspace enforces **IP access lists** (an Enterprise-tier feature, off by default), an admin must allow this app's outbound address first.
Full reference: [Databricks OAuth M2M docs](https://docs.databricks.com/aws/en/dev-tools/auth/oauth-m2m) · [Databricks service principals](https://docs.databricks.com/aws/en/admin/users-groups/manage-service-principals).
Prefer a fully clickable setup? Use **OAuth (service principal)** instead. Access-token setup needs a workspace admin and a notebook or terminal for the service principal token.
In your Databricks workspace, open **SQL Warehouses**, select your warehouse, then open the **Connection details** tab. Copy the **Server hostname** and **HTTP path** into the matching fields in Snap Data Studio.
Go to **Settings » Identity and access**, select **Manage** next to **Service principals**, then **Add service principal » Add new**. Name it `snap-labs-service-principal` and confirm, making sure the **Databricks SQL access** and **Workspace access** entitlements are ticked.
Open the new principal and copy its **Application ID** (a UUID).
On Azure, choose **Databricks managed** if asked how the principal is managed; no Entra ID app is needed.
Back in **SQL Warehouses**, open the **⋮** menu next to your warehouse, select **Permissions**, and add `snap-labs-service-principal` with **Can use**.
Databricks only accepts a token if its owner holds token permission. Go to **Settings » Advanced**, find **Personal Access Tokens**, select **Permissions**, and add `snap-labs-service-principal` with **Can Use**.
Run this in the SQL editor (**New » Query**):
```sql theme={null}
-- CHANGE MY_CATALOG to your catalog name
-- CHANGE APPLICATION_ID to the Application ID from earlier (keep the backticks)
-- (repeat all three for every catalog you want to model)
GRANT USE CATALOG ON CATALOG MY_CATALOG TO `APPLICATION_ID`;
GRANT USE SCHEMA ON CATALOG MY_CATALOG TO `APPLICATION_ID`;
GRANT SELECT ON CATALOG MY_CATALOG TO `APPLICATION_ID`;
```
Grant each catalog that holds tables you want to diagram, and skip built-ins like `system` and `samples`.
**Your data stays private.** Snap Data Studio only reads structure (catalog, table and column definitions) to build your diagrams. It never queries the rows inside your tables. `SELECT` is needed to read the objects' definitions.
Databricks has no UI for issuing a service principal's token, but one notebook cell does it. Select **New » Notebook**, paste the snippet, and run it on serverless or any running compute. Copy the token it prints; it's shown **once**.
```python theme={null}
from databricks.sdk import WorkspaceClient
token = WorkspaceClient().token_management.create_obo_token(
application_id="APPLICATION_ID", # CHANGE: the Application ID from earlier
lifetime_seconds=90 * 24 * 60 * 60, # 90 days; match your rotation policy
comment="Snap Data Studio",
)
print(token.token_value)
```
If the import fails, run `%pip install databricks-sdk` in a cell above and retry. Prefer a terminal? The Databricks CLI equivalent is `databricks token-management create-obo-token APPLICATION_ID --lifetime-seconds 7776000`. On Azure, if the call is rejected, have the service principal mint its own token instead (see the [Azure PAT docs](https://learn.microsoft.com/azure/databricks/dev-tools/auth/pat)).
**Using a personal token:** a token from your own **Settings » Developer » Access tokens** also works and needs no admin, which is handy for a quick trial. It acts as you, though: it can read everything you can, and it stops working if your account is ever disabled. If the token dialog offers scopes, choose **BI Tools**, or pick `sql` and `unity-catalog` manually.
Back in Snap Data Studio, fill in the connection form:
| Field | Value |
| ---------------- | --------------------------------------------------------------- |
| Server hostname | e.g. `dbc-xxxx.cloud.databricks.com` |
| HTTP path | e.g. `/sql/1.0/warehouses/xxxx` |
| Access token | the token from the previous step |
| Catalog / Schema | optional defaults; leave blank to browse everything you granted |
Hit **Test Connection**, then save.
**If the test fails** with *"scopes are too narrow"*, re-issue the token with broader scopes (service-principal tokens are unscoped; personal tokens need `sql` and `unity-catalog`). If your workspace enforces **IP access lists** (an Enterprise-tier feature, off by default), an admin must allow this app's outbound address first.
Full reference: [Databricks service principals](https://docs.databricks.com/aws/en/admin/users-groups/manage-service-principals) · [Databricks token docs](https://docs.databricks.com/aws/en/dev-tools/auth/pat).
## What's next
* [Create a logical & physical model](/guides/create-logical-physical-model) — import from DB once credentials are saved
* [Create a conceptual model](/guides/create-conceptual-model) — link warehouse tables to concepts
* [Quickstart](/get-started/quickstart)